For over two years, we've used this blog as a way to share our favorite Google Earth tips and tricks. Now, we're excited to announce that we'll be bringing you the same helpful updates via the Google Lat/Long blog -- the official blog of the Google Earth and Maps team. You'll not only find news and announcements about new product features, you'll also get tips and be able to see the creative things that other users are doing with Maps and Earth.
So while we're laying the Using Google Earth blog to rest, we hope you'll find that Lat/Long satisfies all your Earthly cravings. And as always, the Google Earth Community and Help Forum are where tons of users go to share knowledge and get answers.
See you at Lat/Long!
The Google Earth team
Thursday, April 30, 2009

Friday, March 13, 2009
Like many of you, I got a kick out of flying to my house the very first time I used Google Earth. But after I'd had enough of zooming, tilting and panning around my neighborhood, I wound up asking myself, "What next?". I knew that Google Earth could take me virtually anywhere I wanted to go. But West London, England, is where I grew up — before I sought out new places, I wanted to see what Google Earth could show me about my own home turf that I didn't already know. As it turns out, it showed me quite a bit, and it was turning on the Google Earth Community layer that really made my neighborhood come alive.
The Community layer showcases placemarks posted to the Google Earth Community by users: Google Earth fans who seek out the coolest places and want to share them. These range from natural phenomena visible from above, to the biggest man-made structures that represent the greatest engineering feats. Near my home, however, I found that the Community layer revealed places of historical interest that I never even knew existed: a centuries-old pub that's played host to both King Henry VIII and the Rolling Stones, the apartment where Bob Marley lived in 1972, and the site of Chelsea Manor — a 16th-century palace that was demolished in the early 1700s.
For me, these fascinating finds represented the coolest thing about Google Earth: its ability to combine local knowledge with the best satellite imagery and make it available to everyone. I was eager to participate and share some information of my own, but I wasn't sure where to start. I remembered that renowned mystery writer Agatha Christie used to live in a cottage a few blocks from my house. Not finding it in Google Earth, I thought this placemark could be of interest to mystery buffs and budding local historians alike. Here's how I added it to the Google Earth Community:
1. After making my placemark in Google Earth, I right-clicked on it and clicked Save As to save it to my computer as a .kmz file (the standard file-type for placemarks).
2. I then visited the Google Earth Community to look for a place to post my placemark. I chose the forum 'People and Cultures.'
3. I clicked New Topic and filled in the blanks, making my subject 'Agatha Christie's house.' I added a description of my placemark, a short biography of Christie, and included an image of the author herself.
4. Time to attach my placemark! I clicked file manager and used the Browse button to find where I'd saved my placemark on my computer. I then clicked Add File, then Done adding files. I then previewed my post to make sure it looked the way I wanted it to.
5. I clicked Submit.
It's that simple! The Community layer is updated about once a month, so hopefully you'll be able to view my very first shared placemark soon, at 58 Sheffield Terrace, London, England. If there's a place you want to share with the world — from the huge and unusual half way around the world to something cool and unique in your own home town — the Google Earth Community is a great way to do it.
The Community layer showcases placemarks posted to the Google Earth Community by users: Google Earth fans who seek out the coolest places and want to share them. These range from natural phenomena visible from above, to the biggest man-made structures that represent the greatest engineering feats. Near my home, however, I found that the Community layer revealed places of historical interest that I never even knew existed: a centuries-old pub that's played host to both King Henry VIII and the Rolling Stones, the apartment where Bob Marley lived in 1972, and the site of Chelsea Manor — a 16th-century palace that was demolished in the early 1700s.
For me, these fascinating finds represented the coolest thing about Google Earth: its ability to combine local knowledge with the best satellite imagery and make it available to everyone. I was eager to participate and share some information of my own, but I wasn't sure where to start. I remembered that renowned mystery writer Agatha Christie used to live in a cottage a few blocks from my house. Not finding it in Google Earth, I thought this placemark could be of interest to mystery buffs and budding local historians alike. Here's how I added it to the Google Earth Community:
1. After making my placemark in Google Earth, I right-clicked on it and clicked Save As to save it to my computer as a .kmz file (the standard file-type for placemarks).
2. I then visited the Google Earth Community to look for a place to post my placemark. I chose the forum 'People and Cultures.'
3. I clicked New Topic and filled in the blanks, making my subject 'Agatha Christie's house.' I added a description of my placemark, a short biography of Christie, and included an image of the author herself.
4. Time to attach my placemark! I clicked file manager and used the Browse button to find where I'd saved my placemark on my computer. I then clicked Add File, then Done adding files. I then previewed my post to make sure it looked the way I wanted it to.
5. I clicked Submit.
It's that simple! The Community layer is updated about once a month, so hopefully you'll be able to view my very first shared placemark soon, at 58 Sheffield Terrace, London, England. If there's a place you want to share with the world — from the huge and unusual half way around the world to something cool and unique in your own home town — the Google Earth Community is a great way to do it.
Thursday, February 26, 2009
To top Time's "top ten", try the Community
Time.com just posted a great list of top ten Google Earth finds. If it's got you hungry for more, the best place to find out about the weirdest, coolest things to see is always the Google Earth Community. I've been checking out the "Huge and Unique" forum, where users have posted hundreds of placemarks that you can download and view in Google Earth.
And it's easy too. If you're new to the community, look for attachments in the threads that interest you. Clicking on them will open a placemark, set of placemarks, or overlay right in Google Earth, and you'll see it in the Places panel. With finds like World's Biggest Sculpture and Faces in Google Earth, thanks to other users I'm well on my way to creating my own personal top ten.
And it's easy too. If you're new to the community, look for attachments in the threads that interest you. Clicking on them will open a placemark, set of placemarks, or overlay right in Google Earth, and you'll see it in the Places panel. With finds like World's Biggest Sculpture and Faces in Google Earth, thanks to other users I'm well on my way to creating my own personal top ten.
Monday, February 23, 2009
Think something's missing? Check your layers!
On the Google Earth Help Forum, we frequently get questions from users who aren't seeing something in Google Earth that they think they should be. Often, this problem has a simple cause: a particular layer is turned off.
Layers hold the key to most of the content you see in Google Earth and, since there are so many, its not always easy to remember which layers to toggle on or off to get the information that you want. Looking for the name of a street? Make sure you've turned on the Roads layer. Can't dive under the ocean? Chances are, it's because your Terrain layer is turned off. Sometimes, the layer you need isn't quite intuitive: If you're having trouble viewing the Titanic, it's probably because you need to turn on your 3D Buildings layer.
So, when it seems like there's something missing, the Layers menu can hold the solution. And while you're at it, why not check out a layer that you haven't seen yet? The wealth of information that's available might surprise you.
Layers hold the key to most of the content you see in Google Earth and, since there are so many, its not always easy to remember which layers to toggle on or off to get the information that you want. Looking for the name of a street? Make sure you've turned on the Roads layer. Can't dive under the ocean? Chances are, it's because your Terrain layer is turned off. Sometimes, the layer you need isn't quite intuitive: If you're having trouble viewing the Titanic, it's probably because you need to turn on your 3D Buildings layer.
So, when it seems like there's something missing, the Layers menu can hold the solution. And while you're at it, why not check out a layer that you haven't seen yet? The wealth of information that's available might surprise you.
Thursday, February 19, 2009
Navigating Underwater in Google Earth
With the new Ocean layer, there's now so much more of the Earth to explore. But navigating underwater, and dipping above and below the ocean's surface, can take a bit of getting used to.
Diving underwater from the regular "top-down" view might seem a little disorienting. It's best to tilt your view first, so your view is almost parallel to the ocean's surface. This will give you the clearest view of the ocean floor terrain once you're underwater, and give you a better sense of how deep you're going .
There are three ways to tilt your view in Google Earth:
Note that crosshairs will appear wherever you click your mouse, and your view will tilt from this point.
Once your view is almost parallel to the ocean, keep zooming in until you are below the surface (note that you don't want to be completely parallel to the ocean's surface, otherwise you'll just fly over it without ever going underneath). When you're under the surface, you can "swim" around the same way that you'd navigate if you weren't underwater. Be sure to tilt your view upward to check out the ocean's surface from below.
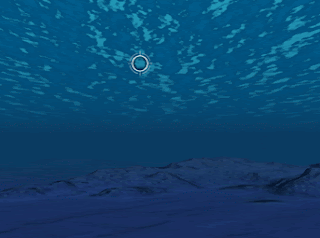
To come above water again, click anywhere on the ocean's surface, like in the image below. Tilting your view upward from that point will allow you to come up for air.
For more information about navigating in Google Earth, check out this section of the Google Earth User Guide.
Diving underwater from the regular "top-down" view might seem a little disorienting. It's best to tilt your view first, so your view is almost parallel to the ocean's surface. This will give you the clearest view of the ocean floor terrain once you're underwater, and give you a better sense of how deep you're going .
There are three ways to tilt your view in Google Earth:
- If your mouse has a middle button, hold it down and move the mouse forward or backward.
- If your mouse has a scroll wheel, press the shift key and scroll.
- Hold down the shift key and your left mouse button while moving your mouse.
Note that crosshairs will appear wherever you click your mouse, and your view will tilt from this point.
Once your view is almost parallel to the ocean, keep zooming in until you are below the surface (note that you don't want to be completely parallel to the ocean's surface, otherwise you'll just fly over it without ever going underneath). When you're under the surface, you can "swim" around the same way that you'd navigate if you weren't underwater. Be sure to tilt your view upward to check out the ocean's surface from below.
To come above water again, click anywhere on the ocean's surface, like in the image below. Tilting your view upward from that point will allow you to come up for air.

For more information about navigating in Google Earth, check out this section of the Google Earth User Guide.
Wednesday, January 07, 2009
Saving images with Google Earth for iPhone
Stefan Geens, whose blog Ogle Earth is full of cool and inspiring Google Earth tricks, has a great tip for using Google Earth for iPhone. To maneuver between views quickly, you can save Google Earth imagery by taking iPhone screenshots.
To do this, make sure the Google Earth view you wish to save is visible on your iPhone screen. Press your phone's on/off button while holding down the home button -- the screen will briefly flash, and an image of your screen will be saved and placed in your camera roll.
This trick allows you to flick between different Google Earth views in your camera roll without having to start-up Google Earth on your phone, or wait for different imagery to load.
To do this, make sure the Google Earth view you wish to save is visible on your iPhone screen. Press your phone's on/off button while holding down the home button -- the screen will briefly flash, and an image of your screen will be saved and placed in your camera roll.
This trick allows you to flick between different Google Earth views in your camera roll without having to start-up Google Earth on your phone, or wait for different imagery to load.
Monday, January 05, 2009
Can I Take My House Out of Google Earth?
 While it’s pretty cool to see your home in Google Earth (GE), some folks ask Google if they can take images of their home out of GE. The answer?
It depends.
Almost every GE newbie opens GE, finds the ‘fly to’ box and searches for their house (or maybe grandma’s house). If Google has their location available, they’ll most likely see the top of their house nestled amongst familiar community landmarks.
Now, with Google’s Street View layer, you can often even swoop down onto the street and have a look around your neighborhood. For some people this enhancement can raise concerns, and so there is a ‘report a concern’ or ‘report an inappropriate image’ link at the bottom of most street view images so you can let Google know if something’s not quite right.
Why isn’t this available for all of the Google Earth imagery? The explanation comes from looking at the sources of each type of imagery. Google partners with third-party data providers all over the world to be able to bring you the satellite and aerial images you see in most of Google Earth. Google doesn’t control satellites nor take these pictures themselves.
On the other hand, when it comes to Street View images, Google has literally sent out a fleet of cars to take images of more and more communities. Thus, Google has more flexibility in what it can put in or take out of the street view images. So if there’s an image that violates the Google Earth or Google Maps privacy policy, there’s a good chance it can be removed.
If you’d simply like to have your house, car, etc. not show up anywhere in Google Earth that may be a little more of a challenge. The images included in Google Earth are images that you’d be able to see by flying over someone’s house, and are in general, publically available. Moreover, Google doesn’t alter the content of images that we receive from third-party sources—Google won’t manually extract an image from what you see.
If you’d like to still pursue getting an image taken out of the satellite imagery, your best bet is to directly contact the data provider that has taken the image and let them know that there’s a problem. The data provider is listed on the copyright line in the Google Earth images (at the bottom center of the Google Earth image).
Next time you’re checking out your favorite places, take in all the possibilities, turn on the Street View layer.
Thursday, December 11, 2008
What About Real Time Imagery?
 The most common question that the Google Earth team receives is "is the imagery in real time?" The simple answer is "no." The better answer is why it can't be.
A common misconception is that Google collects and owns this imagery. In actuality, we acquire this imagery from many different data providers, including TeleAtlas. These companies are the ones that own the satellites, collect the imagery, and offer it to the world. For Google Earth, we take the best imagery we can find from these providers and we piece it together on the 3D globe. As you can imagine, this entire process of getting a satellite into space, having it take pictures, getting those pictures back to Earth, reviewed, and placed into Google Earth can take some time. We want to make sure that we're providing you with quality imagery, so we do a lot of checking on the data.
Additionally, you'll find that we may have new imagery in some areas, and older imagery in areas right next to it. We do this because this older image is of a higher resolution or better quality than the newer image we have available. We're working on making the process better, and we've teamed up with GeoEye to get imagery from their new Geo-Eye 1 satellite, which will be taking high-resolution photographs of large portions of the Earth's surface.
Will this lead to real-time imagery? Probably not any time in the near future. To do that, we'd need hundreds, if not thousands of satellites all running 24 hours a day to capture imagery. What if you need more recent imagery than what's available in Google Earth? If that's the case, we recommend that you zoom in on the area you're interested in, and look at the copyright information displayed in the bottom of the Google Earth window. You can then contact the data provider listed by visiting their website and see if they have more recent imagery available.
Tuesday, December 02, 2008
Check Out the User Groups
 The Earth Help Group is a valuable resource for you to search for Earth related answers provided by other users, to post a question you need assistance with, or to discuss your support questions.
In addition to other users, there are two kinds of experts in the these groups that can help you. Earth Rangers are Google employees and can be identified by the
Not sure how to begin? Please look at other resources displayed in the Welcome Message before you post!
Wednesday, November 19, 2008
Geotagging iPhone Photos
 With the debut of of iPhone 2.0 software, you can enable the Camera app to geotag your photos on the iPhone 3G. To enable this on your iPhone, click the Settings icon > General > Location Services.
Once you've done this, all photos you take on the iPhone are assigned a location. You can then upload these photos to Picasa and then port them over to Google Earth using the geotagging feature of Picasa.
This saves you the step of manually geotagging your pictures. Plus, your family will be hugely impressed when you show them photo albums in Google Earth :-)
Looking at the Source
 At anytime, you can view the KML source of items in the Places panel. To do this, select the item and click Edit > Copy. In a text editor, click Edit > Paste. The KML source appears in the new document.
Personally, I use this method to examine the source of Places data I've come across that show content in an interesting way. You can also examine the source of Layers content by right clicking (CTRL + click on the Mac) a point of interest in the 3D viewer, saving it to My Places and then use the method described above.
Thursday, October 30, 2008
Timeline Tutorial
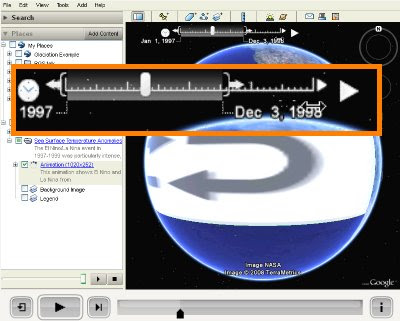 Richard Treves is the author of kokae.com and blogs about the usability of Google Earth projects at Google Earth Design.
Recently, he created a very interesting timeline tutorial video that describes how to use the time slider in Google Earth. This particular post also provides a reasonable critique of this feature.
The time slider displays content in Google Earth along a sequence of time. Check out Frank Taylor's examples of time animations on gearthblog.com.
Learn more about using the time slider.
Friday, October 24, 2008
Creating Dynamic Views in Movie Maker
 If you're making a movie in Google Earth, you might want to change the camera angle or altitude to change as you fly over different places. The best way to do this is to use placemarks, rather than a single path.
If you choose to have your movie follow a path, your camera angle and altitude will remain the constant along that path. When you create a placemark, you can create specific 'View' settings that affect the way it will appear in your movie. Mouse over each field in the 'View' tab for explanations of each term, or click Snapshot current view to apply your current view settings to that placemark.
In this way, you can make a more compelling movie that shows dynamic views.
Wednesday, October 22, 2008
KML Interactive Sampler
 I am very excited by the recently-published KML Interactive Sampler (read the announcement). Using the Google Earth plugin, it allows you to test sample KML and see this content immediately in Google Earth. You can also play with your own KML. For example, you can copy and paste KML into the main field, click Update Earth and instantly see how your code will appear to end users.
For now, you'll need Windows to use this tool, as the Google Earth plugin is currently only supported on this platform. Rest assured that a soon-to-be-released Mac version is in the works.
Learn more about using KML.
Friday, October 17, 2008
Navigating and Embedding Photos
As Google has recently published new imagery in Street View, knowing how to navigate photos becomes even more useful. You can navigate high resolution imagery in the following layers:
Street View
Gallery > GigaPxl Photos
Gallery > GigaPan
To view this imagery, enable any of these layers and navigate to the appropriate location. Click an icon to enter the photo. Remember that you can move around within each photo by clicking or dragging the image. Learn more about navigating photos.
You can embed your own custom Street View on your website using Google Maps. This is both easy and very cool (see example at left).
To do this, go to Google Maps and navigate to your favorite Street View. Click Link to this page, copy the web address from the Paste HTML to embed in website field in your browser and paste it into the HTML code of your website. To resize and preview the map, click Customize and preview embedded map.
Street View
Gallery > GigaPxl Photos
Gallery > GigaPan
To view this imagery, enable any of these layers and navigate to the appropriate location. Click an icon to enter the photo. Remember that you can move around within each photo by clicking or dragging the image. Learn more about navigating photos.
View Larger Map |  |
To do this, go to Google Maps and navigate to your favorite Street View. Click Link to this page, copy the web address from the Paste HTML to embed in website field in your browser and paste it into the HTML code of your website. To resize and preview the map, click Customize and preview embedded map.
Thursday, October 02, 2008
Searching for Planets
 This functionality was not available when Sky launched, but now you can search for planets in our own solar system. For example, if you search for Mars, Sky shows you the planet at its approximate location at the time shown.
To do this, in the Search panel, click Search the Sky, enter the appropriate planet name and click the Search button.
Learn more about using Sky in the Google Earth user guide.
Thursday, September 25, 2008
Purple Buildings
 Did you know that you can view additional information about many of the 3D models available Google Earth (Layers > 3D Buildings)?
Mouse over certain buildings and they appear purple. Click these buildings to view additional information from the 3D Warehouse.
Wednesday, September 17, 2008
Monday, September 08, 2008
Italian 3D Models
 Antonino G is a gifted Italian 3D modeler who has a fondness for historical Europeans buildings. If you are new to 3D models in Google Earth, be sure to check out his 3D warehouse collection.
Antonino has also modeled exceptional modern architecture as well, such as the Stadio San Filippo di Messina. Personally, I love the Castello di Milazzo model he created. Antonino has also gathered a collection of buildings in Sicily, which seems to have more than its share of great models.
Antonino's work is also featured in My Favorite Thumbnails collection, which provides modelers great examples of thumbnail images used to preview individual models in the 3D Warehouse.
Tuesday, August 26, 2008
Map Your Own Theme
 I've been playing with the Thematic Mapping Engine, which is a web-based tool that allows you to generate visually compelling KML based on statics such as those available at UNdata. The less tech savy will be excited to note that this tool requires no coding skills whatsoever. So go ahead and impress your friends. Or check out these examples.
The resulting presentations are pretty darned nifty and you can control many aspects of how this information is displayed in both Google Earth and the Google Earth browser plugin.
Subscribe to:
Posts (Atom)